FORMS
How to Create a Lead Capture Page, Using Scale Fast
How to Create a Lead Capture Page, Using Scale Fast
This tutorial covers how to create a lead capture page using Scale Fast.
A lead capture page, also sometimes called an opt-in page or a squeeze page, is a special type of page that allows your website visitors to add themselves to your Contact List in Scale Fast, without your direct involvement.
This tutorial focuses on the key steps to achieving this purpose. For a general overview of all the page building features of Scale Fast, see our Page Building tutorial.
Table of Contents
Here are the steps we'll be walking through:
1. What is a Lead Capture Page and Why Do I Need One?
2. Building a Lead Capture Form with Scale Fast
3. Connecting a Lead Capture Form to a Website Page (optional but highly recommended)
4. Enhancing Your Lead Capture Page
5. What Next?
What is a Lead Capture Page and Why Do I Need One?
Arguably, the most important screen in Scale Fast is the Contact Lists screen.
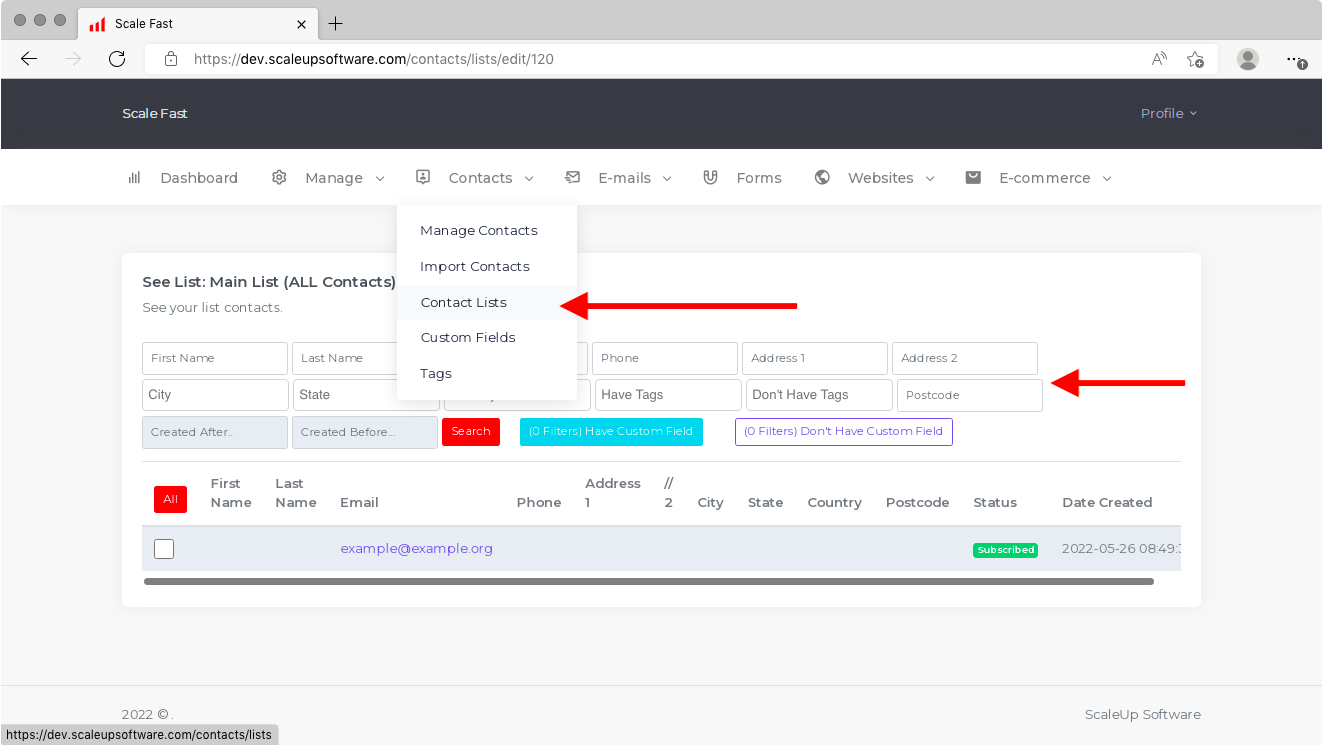
This is where you will store all of your customers and/or prospective customers, along with their contact information. Using Scale Fast, you can send emails to these people, in order to:
* share news about your business
* drive traffic back to your website or blog
* most importantly, point them to your order forms and make sales.
To learn how to send emails to your Contact Lists, look at our Emails tutorial.
When you open a new account with Scale Fast, your Contact Lists will be empty. There are three different ways to populate your Contact Lists:
1. Add your leads manually, one by one
2. Import a whole list of leads from another CRM system
3. Send people to a "lead capture" page where they can input their own information and automatically be added to your Contact List
This tutorial focuses on method 3. For methods 1 and 2, look at our Contact Lists tutorial.
Once you have a lead capture page, you can link to it from your website or blog, and/or promote it with paid advertising. If you are doing paid advertising, a lead capture page is highly recommended, because it enables you to follow up with people who are interested but not yet ready to buy, at no additional advertising cost.
Building a Lead Capture Form with Scale Fast
The first part of building a lead capture page is the form through which people will enter their contact information.
1. In the Scale Fast menu, click on Forms
2. Click on Create Form
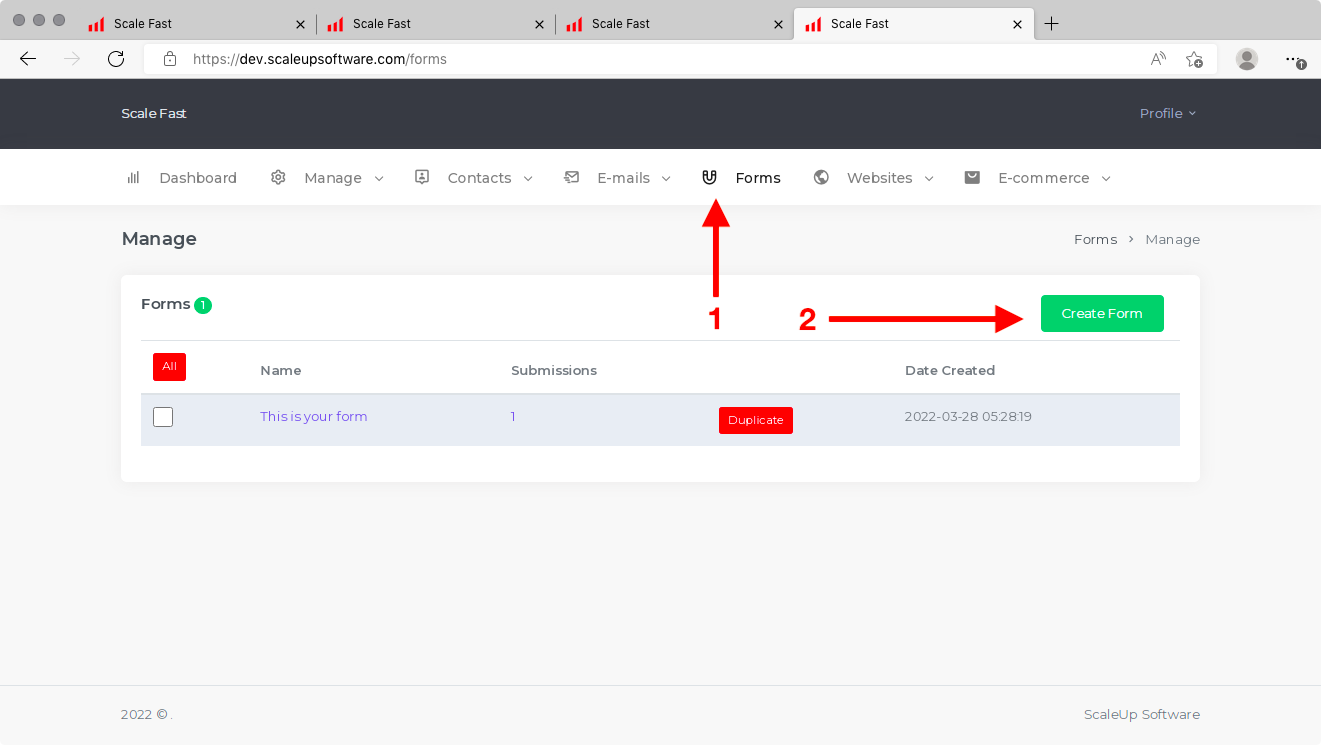
When you click to edit the form you just created, you will see a screen with three columns.
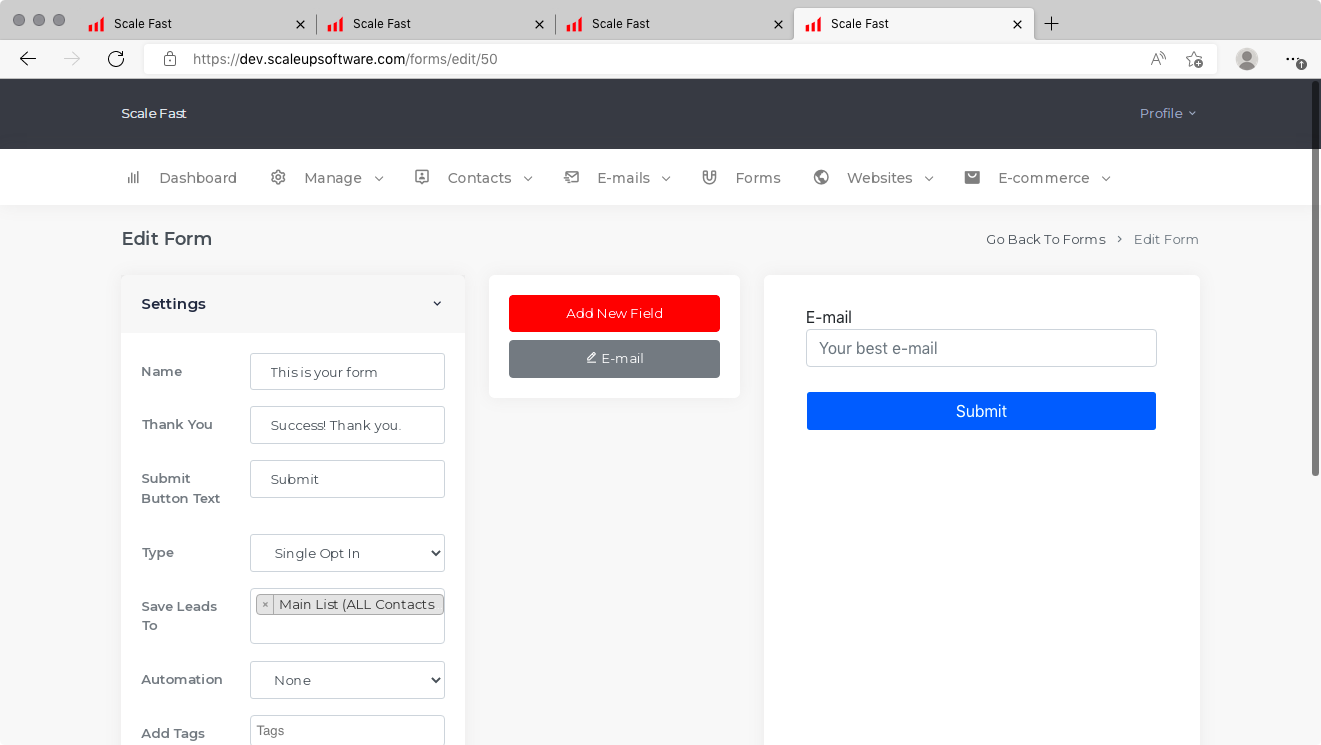
The left column is where you can adjust properties of the form, such as which list to add the leads to, the style of the form, and more. The middle column is for adding fields to the form for different pieces of contact information. The right column is a preview of what the form will look like.
The left column is divided into three sections: Settings, Styles and Share & Embed. In the Settings section, you will see the following fields:
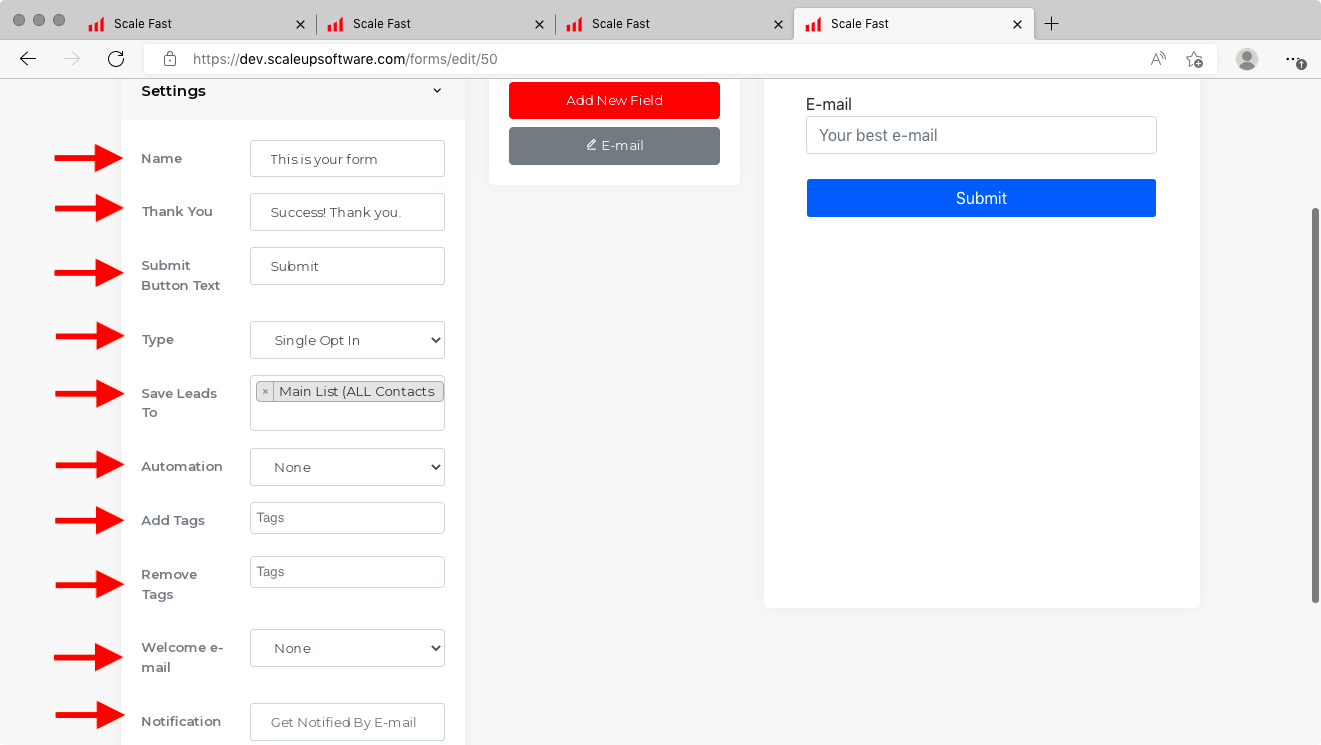
Name: The name of your form. Customers will not see this, but if you plan to create multiple forms, naming them will help you keep track of them within Scale Fast.
Thank You: A message to show customers after their information was submitted.
Submit Button Text: The text of the submission button.
Type: Either single opt-in or double opt-in. If you select double opt-in, anyone who submits the form needs to confirm their email address before they are added to your Contact List. If you select single opt-in, they are added immediately after submitting the form.
Save Leads To: If you have multiple Contact Lists, you can select which one(s) people will be added to after submitting this form. If not, you should select Main List (ALL Contacts).
Automation: If you have set up an automation sequence, you can apply it to people who submit this form. See our Automation tutorial for more details.
Add Tags: When someone submits this form, these tags will be added to their record within Scale Fast.
Remove Tags: When someone submits this form, these tags will be removed from their record within Scale Fast.
Welcome e-mail: Select an email to be automatically sent upon submission of this form.
Notification: If you want to be notified each time someone submits the form, enter your own email address in this box.
Adding New Fields
To add fields, click on Add New Field in the middle column. For each field, you will see the following options:
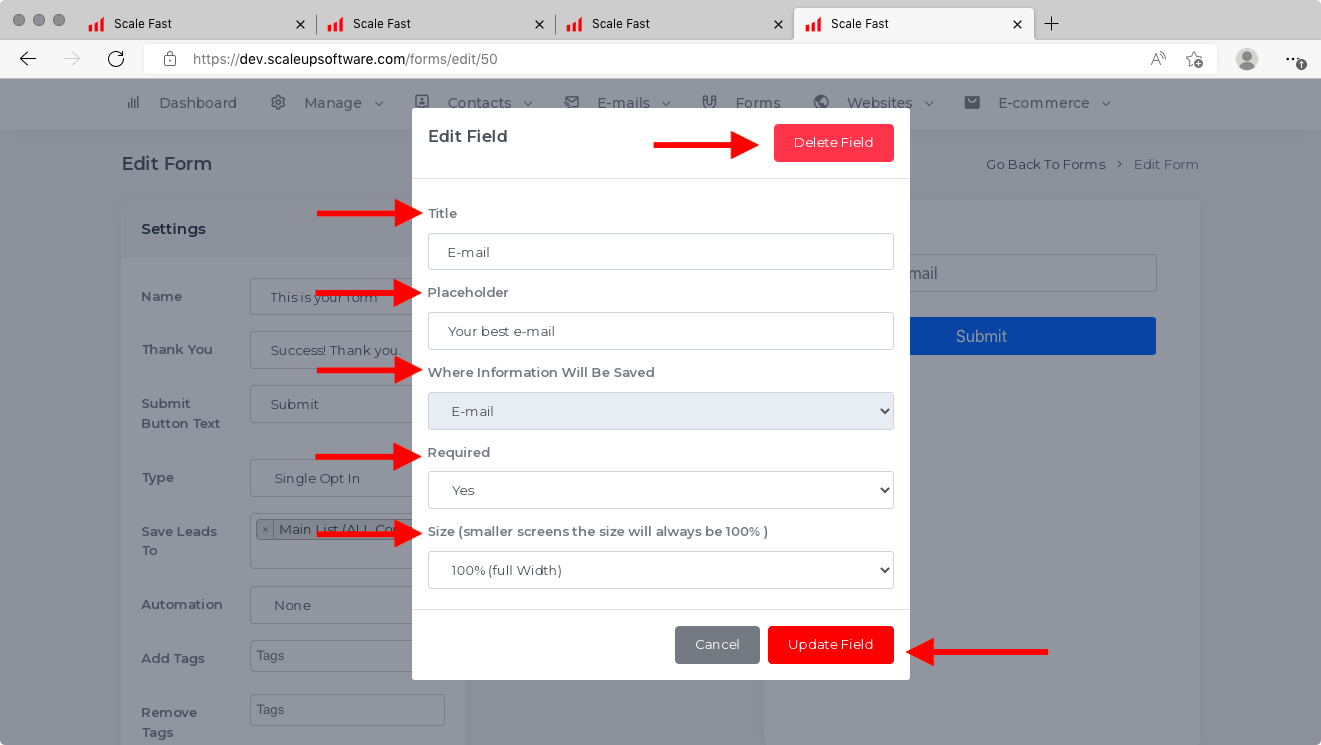
Title: Customers will see this as the label of the field. This will tell them what information to enter, so be clear.
Placeholder: Customers will see this text within the field before they start typing, but it will disappear when they start typing. This is best used as an sample piece of information.
Where Information Will Be Saved: Select which field within your Scale Fast Contact List to save this piece of information. For more help, see the Contact Lists tutorial.
Required: Whether the customer can leave this field blank, or whether they are required to complete it to join your Contact List.
Size: The width of the field as a percentage of the total width of the form. This only applies for larger screen sizes. For smaller sizes, it will always be 100%.
When you are happy with your field, click on Update Field. To remove it from the form, click on Delete Field.
Styling and Deploying
Remember that you can style your form by opening the Style section in the left column. There are options to change the fonts, colors and spacing. If you do not see the right column preview update with your new styles, refresh the page.
When you are happy with the style of your form, open up the Share & Embed section. You will see two text boxes:
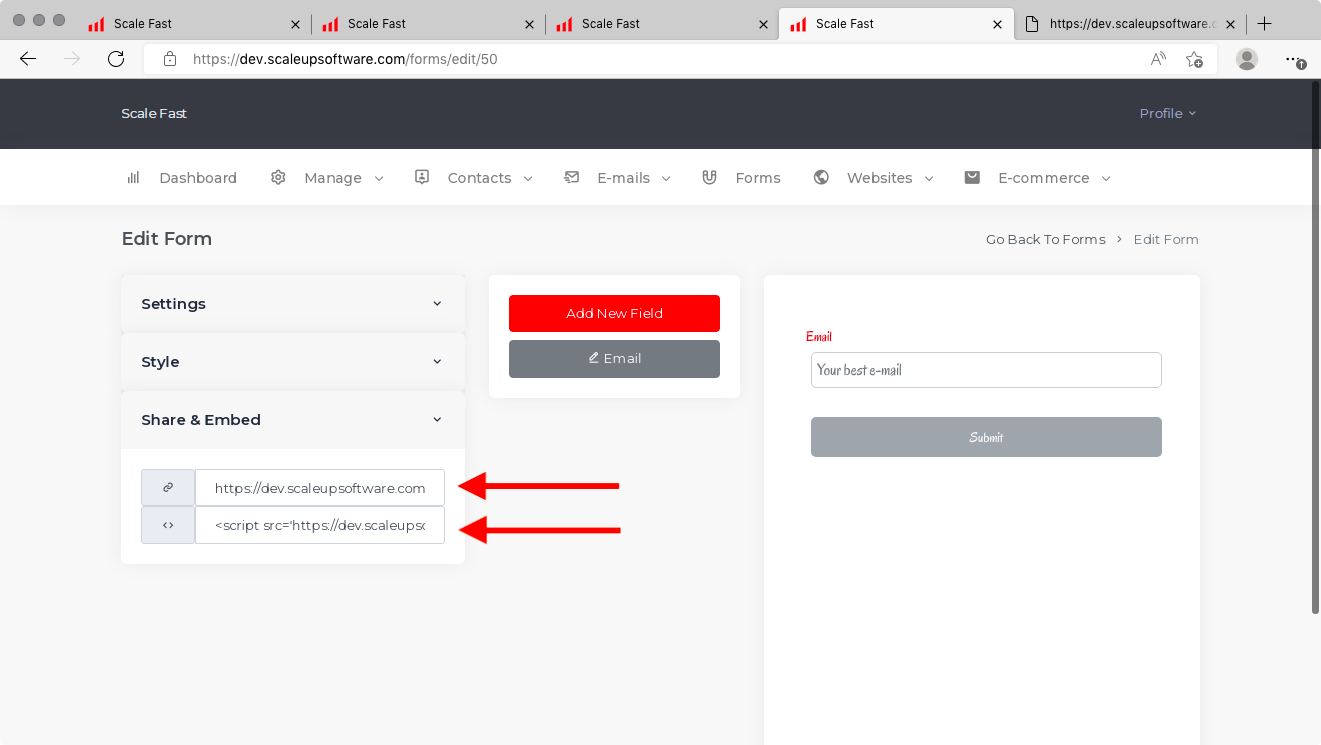
When you click within any of the two text boxes, the text will be automatically copied to your clipboard, ready to be pasted.
Upper Text Box: You can use the text in this box as the link to your lead capture page. However, it is not recommended, because the page will only display a lone form with no context.
Lower Text Box: You can use this code if you are building a complete lead capture page with a system OTHER than Scale Fast.
The recommended way to build a complete lead capture page is to use the page building features of Scale Fast, which is covered in the next section. If you use the recommended method, you do NOT need to copy the text out of either text box.
Connecting a Lead Capture Form to a Website Page (optional but highly recommended)
Now that your form is created, the next step is to embed it within one of your website pages. You can either add it to an existing page, or create a new page. Either way, this page should give some context to the form and give your website visitors reasons to sign up.
1. In the Scale Fast menu, click on Websites
2. Make sure you have created a website in Scale Fast. If you don't yet have one, see the Websites tutorial.
3. If you want to add the form to an existing page, click on the edit button next to the page. Or, if you want to create a new page, click Create New Page.
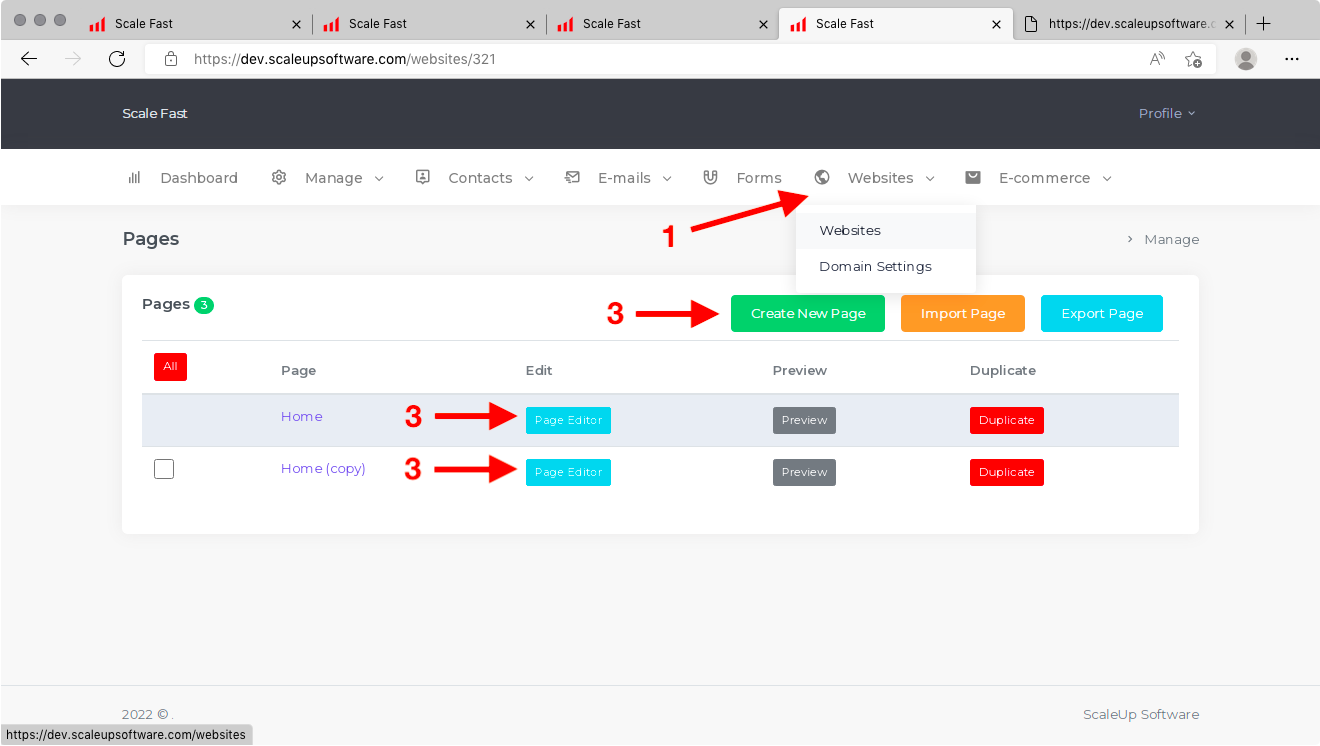
The rest of this tutorial assumes you are using one of your existing pages. If you need help creating a new page, this is a good time to consult the Page Building tutorial.
Once you have opened up the page editor for your chosen page, the next step is to add the form you created earlier. In order to, you will need to click on an icon in the left column that looks like four horizontal lines. Before you click on this icon, you will see the words "Content Blocks" appear next to the icon.
After you click on the icon, a pop-up column will appear. Click on the shaded box at the top of this pop-up column. It may include the word "Headline" or something else.
At this point, a menu will appear. Click on Forms within the menu.
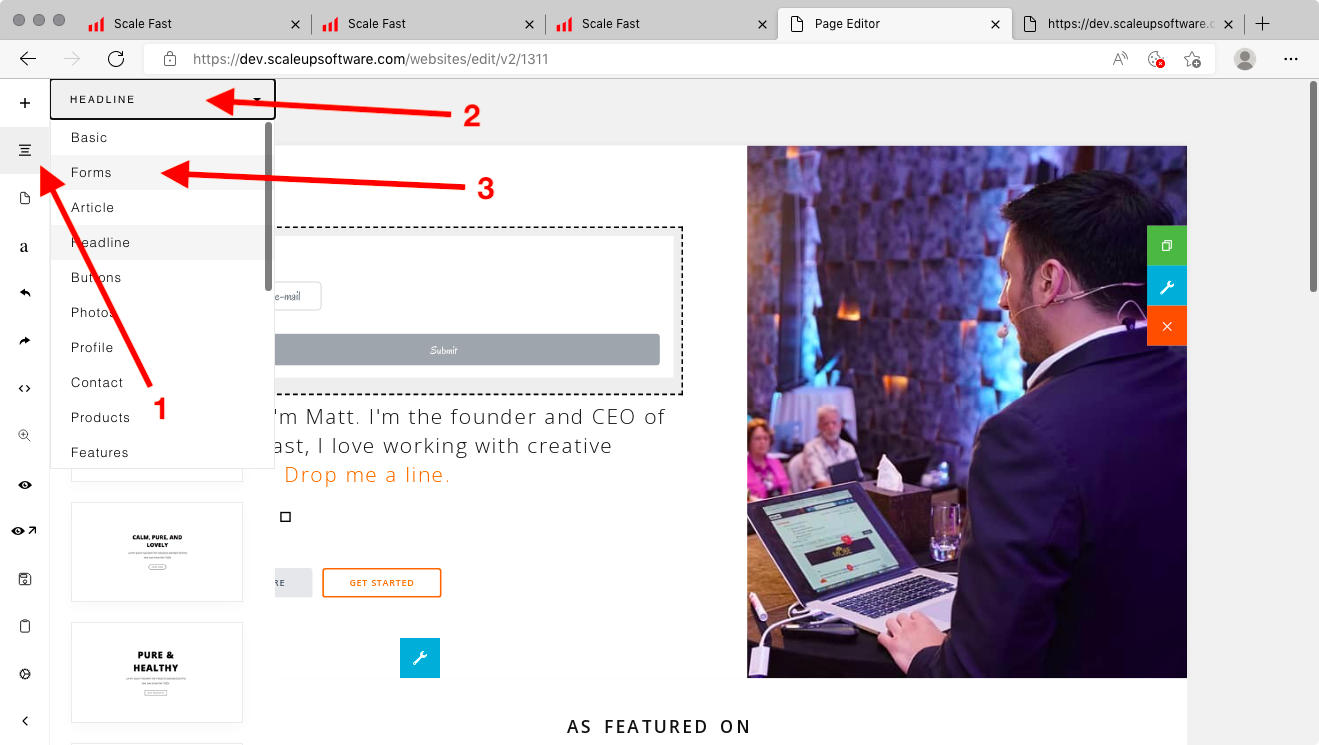
After you click on Forms, all of the forms you have created will appear in the pop-up column. Click and drag your desired form into your desired position on the page canvas.
Finally, click on Save in the left column to save your page.
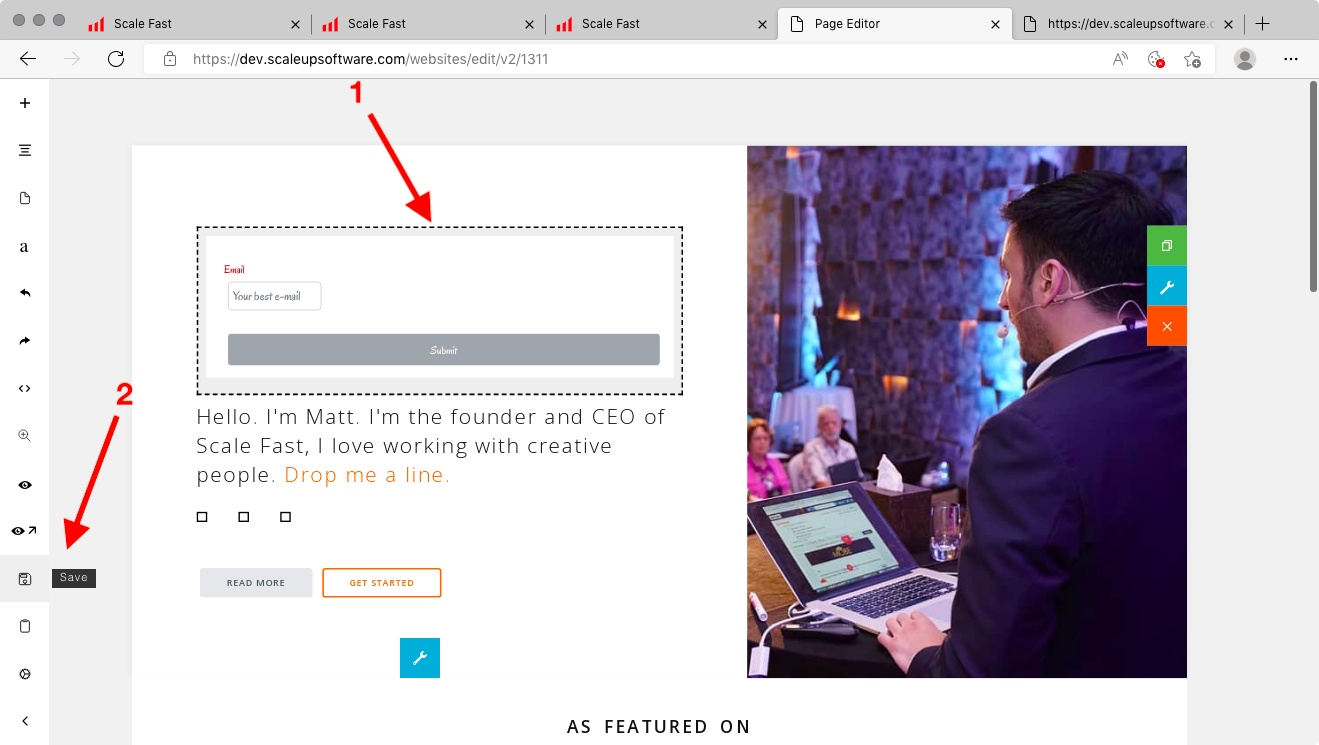
Enhancing Your Lead Capture Page
As explained, you will get a better sign-up rate on your lead capture page if you include some context and reasons for people to sign up.
To create a headline for your lead capture page, click on any element within your page. Then click on the plus button and select Headline.
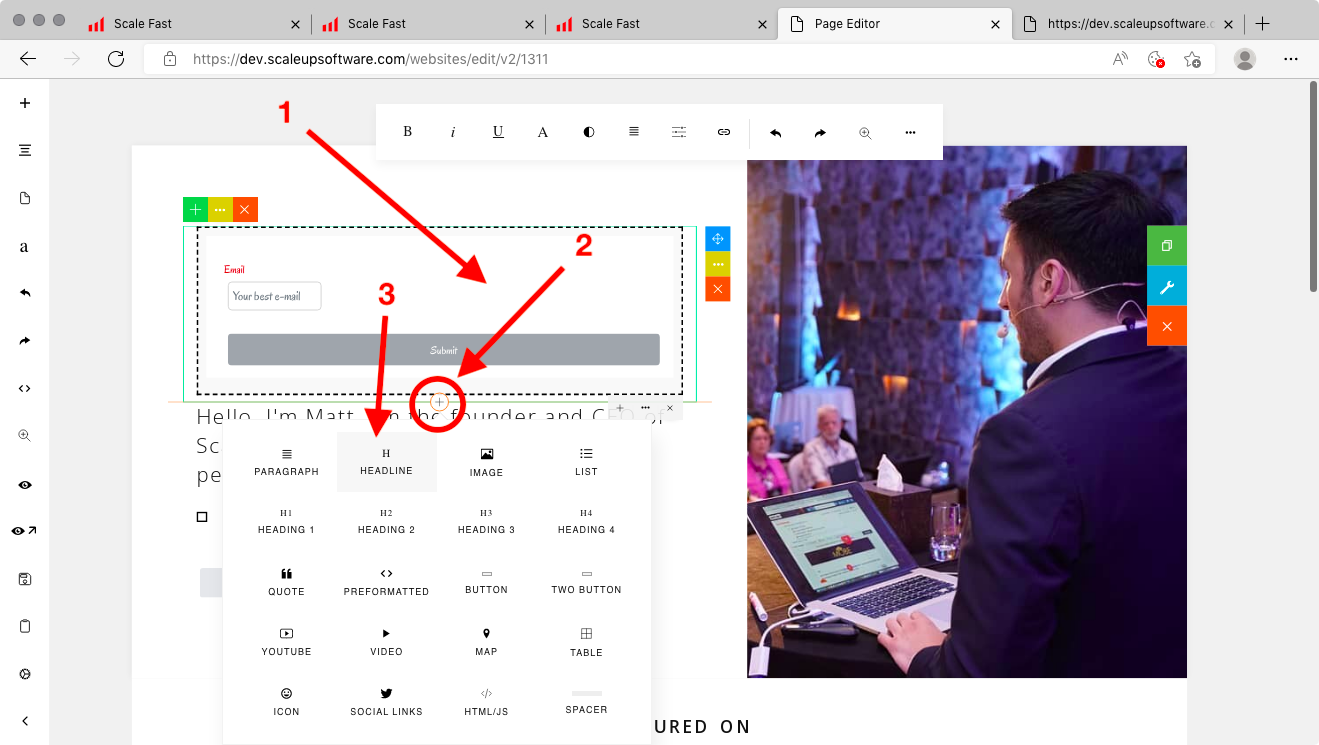
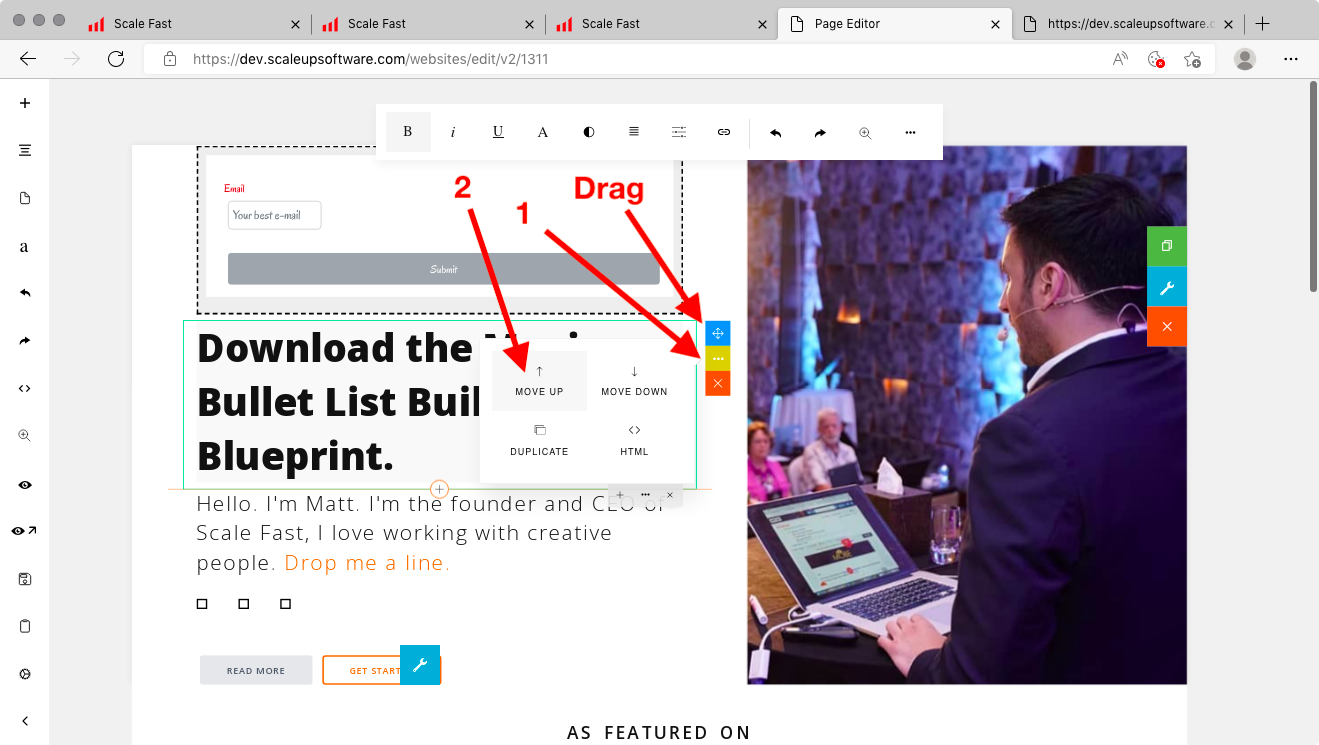
Some sample text will appear. Edit this to something relevant. You can adjust the position on the page by clicking on the three dots and then clicking on Move Up or Move Down. Alternatively, you can click and drag the headline via the blue box on the right.
To create bullet points for your lead capture page, click on the plus button and select List. Again, some sample text will appear. Edit this to something relevant and position the element to your liking.
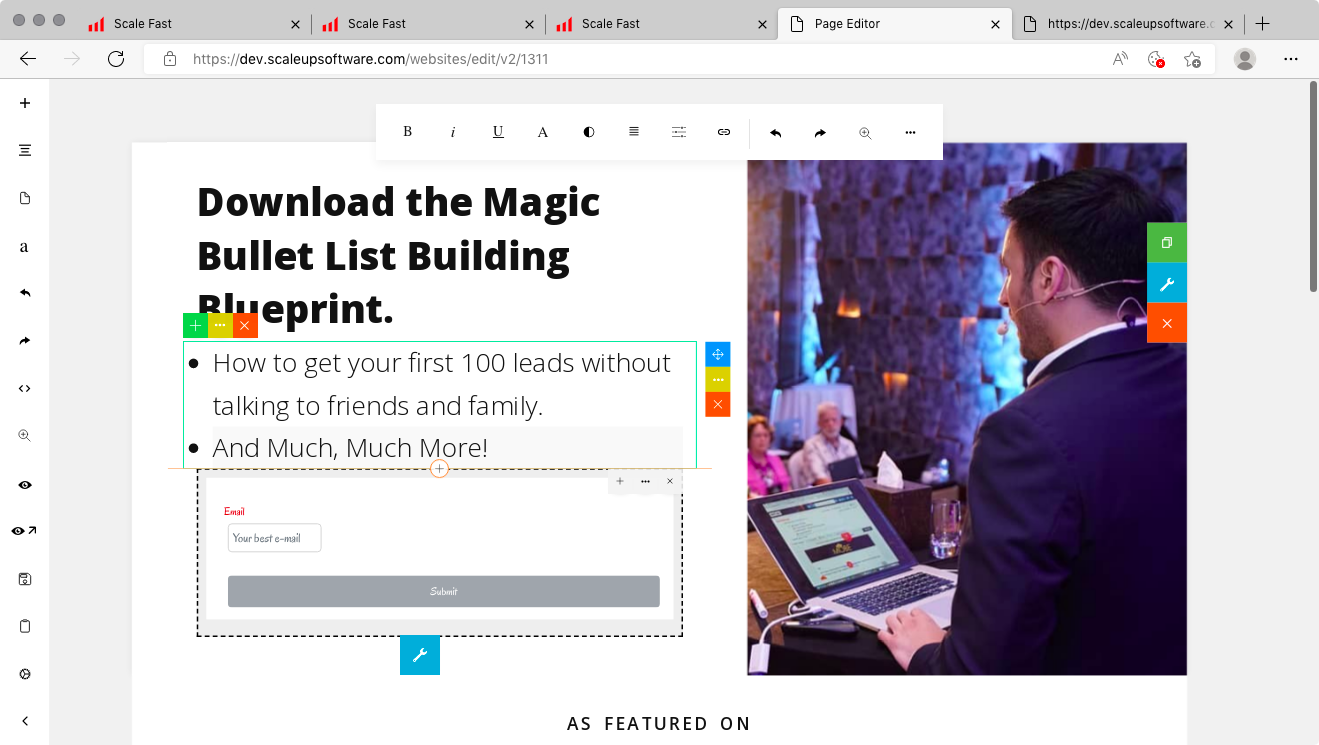
In your headline and/or bullet points, it's highly recommended to offer a deliverable in exchange for joining your Contact List. This could be a digital product, a coupon or special offer, a phone consultation, or anything that would work in your market.
Remember to save your page again.
What Next?
When you are happy with your lead capture page, retrieve the link to it from the Websites screen in Scale Fast, as shown.
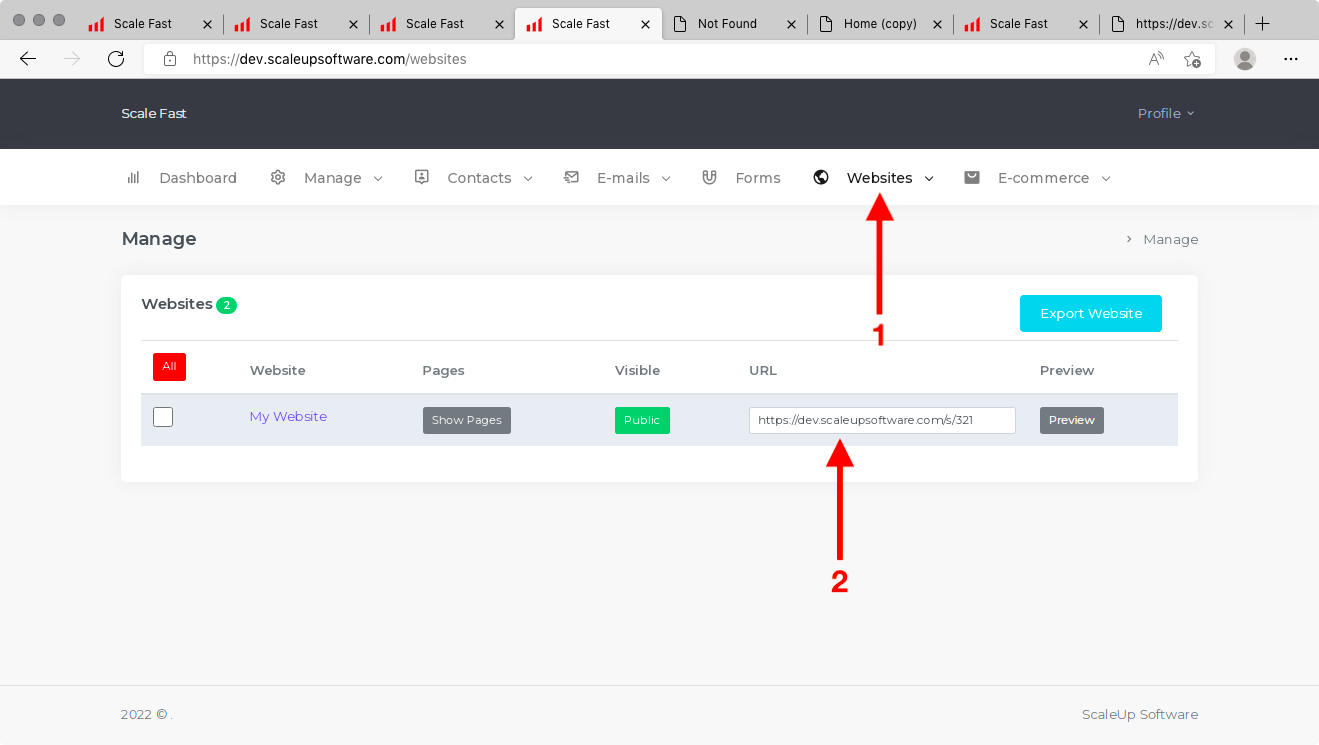
Then, you can use this link as the destination for your paid advertising campaigns, or include it on your website or blog.

