FUNNEL
Building Sales Pipelines with Scale Fast
Building Sales Pipelines with Scale Fast
This tutorial covers all the tools available to build sales pipelines with Scale Fast.
By the end of this tutorial, you will know how to use a sales pipeline in your business and how to set it up using the tools within Scale Fast.
You will be able to configure sales pipelines containing a series of well-defined stages, and individually track the status of each customer who is moving through the sales pipeline.
If you want to automatically add customers to a sales pipeline by having them complete a form on your website, or enable your sales representatives to manage their own leads, check our other tutorial about Assigning Leads to Phone Sales Reps.
Table of Contents
1. What is a Sales Pipeline? (And How Is It Different From an Automation Sequence?)
2. Creating and Editing a Sales Pipeline
3. Adding and Editing Stages
4. Adding and Editing Deals
5. What Next?
What is a Sales Pipeline? (And How Is It Different From an Automation Sequence?)
Does your business sell products or services with a longer sales cycle, where you expose your prospective customers to a series of steps or stages before they are ready to buy?
This is often called a sales funnel.
Both the Automation and the Pipelines features of Scale Fast enable you to build types of sales funnel.
You may already be familiar with the Automation feature, which enables you to send your contacts a series of marketing emails at pre-determined intervals.
The Pipelines feature is similar, but with a key difference. Instead of contacts moving automatically from one step to the next at pre-determined intervals, you can move them between steps at your discretion. This enables you to tailor the customer experience between the customers who quickly become ready to buy and those who need longer to decide.
As the rest of this tutorial will show you, the Pipelines feature also comes with a number of extra sub-features to ease the process of managing these customer relationships. These include the ability to delegate your customer relationship management to staff, the ability to set follow-up dates for individual customers, and more.
Creating and Editing a Sales Pipeline
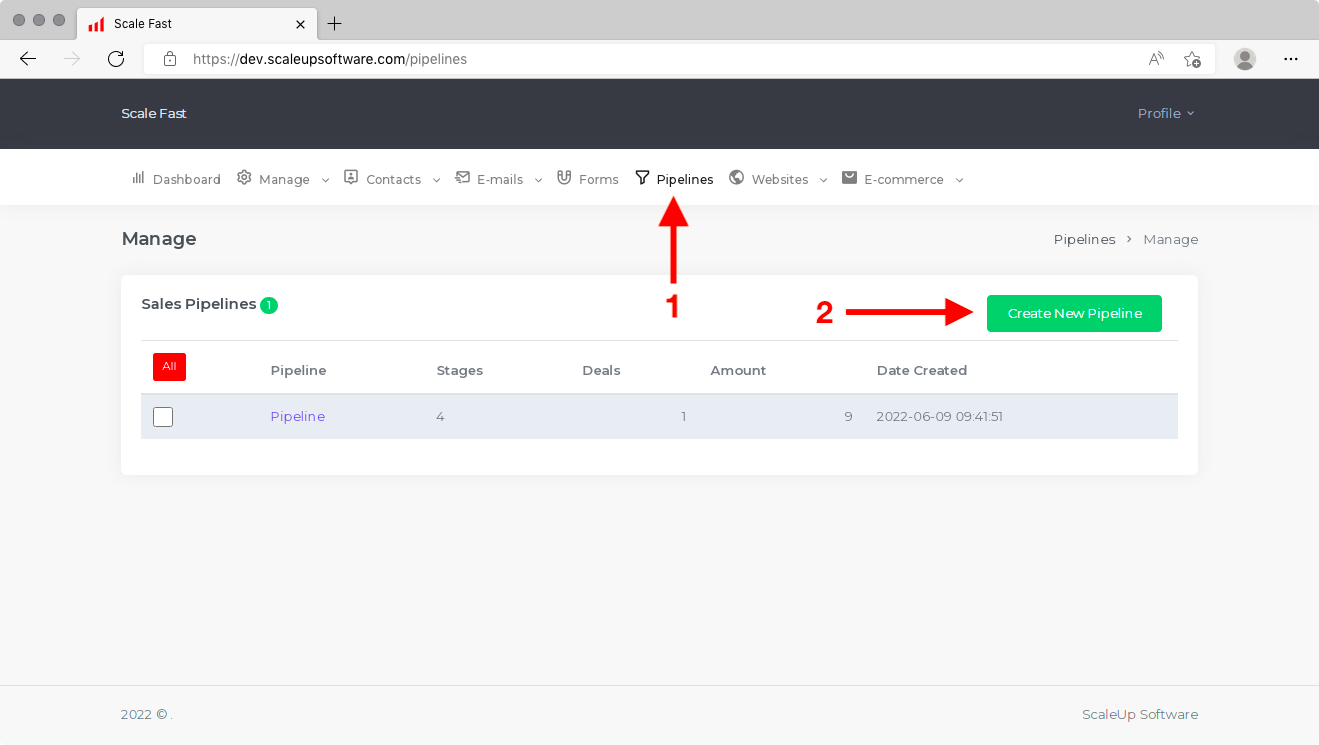
To create a new Pipeline, click on Pipelines in the main menu. The screen will look similar to the one below. If it's your first time visiting the Pipelines screen, the table will be empty. If you have created some Pipelines already, they will all show in the table.
Click on the Create New Pipeline button.
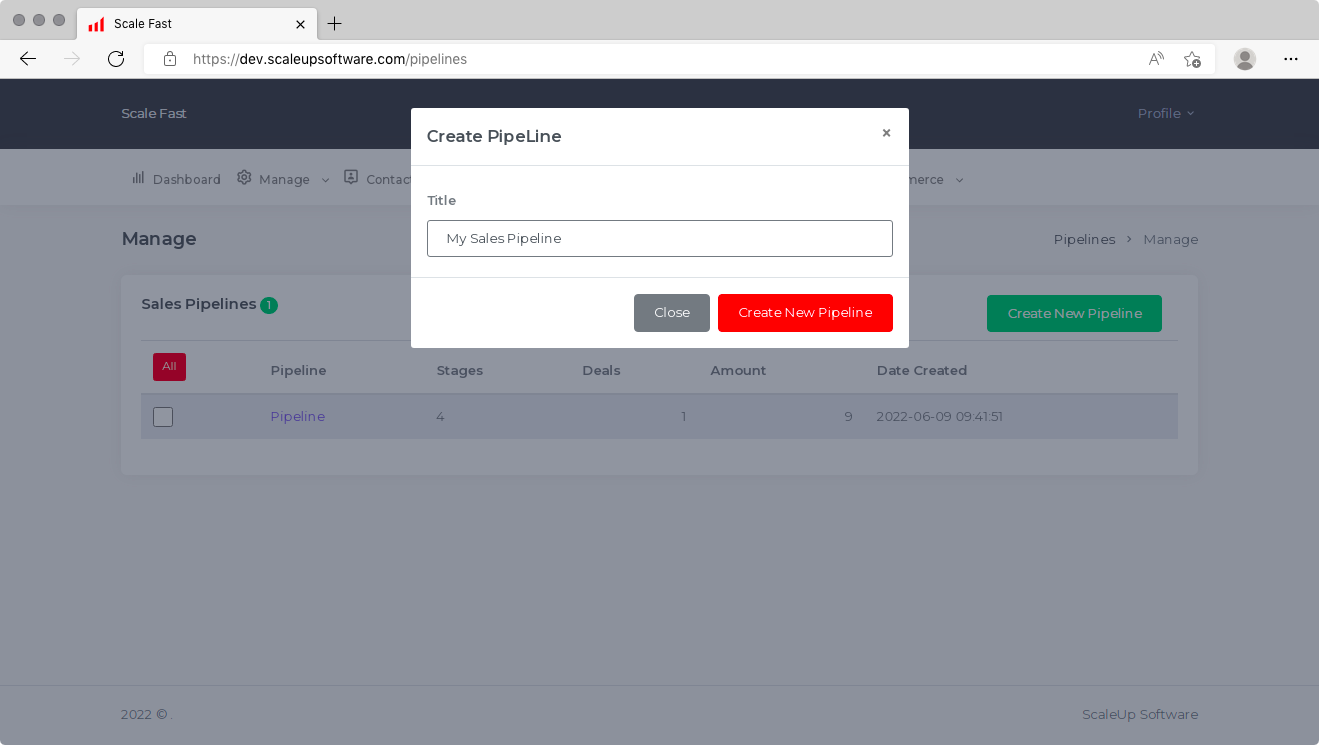
Next, write a name for your Pipeline and click on Create New Pipeline.
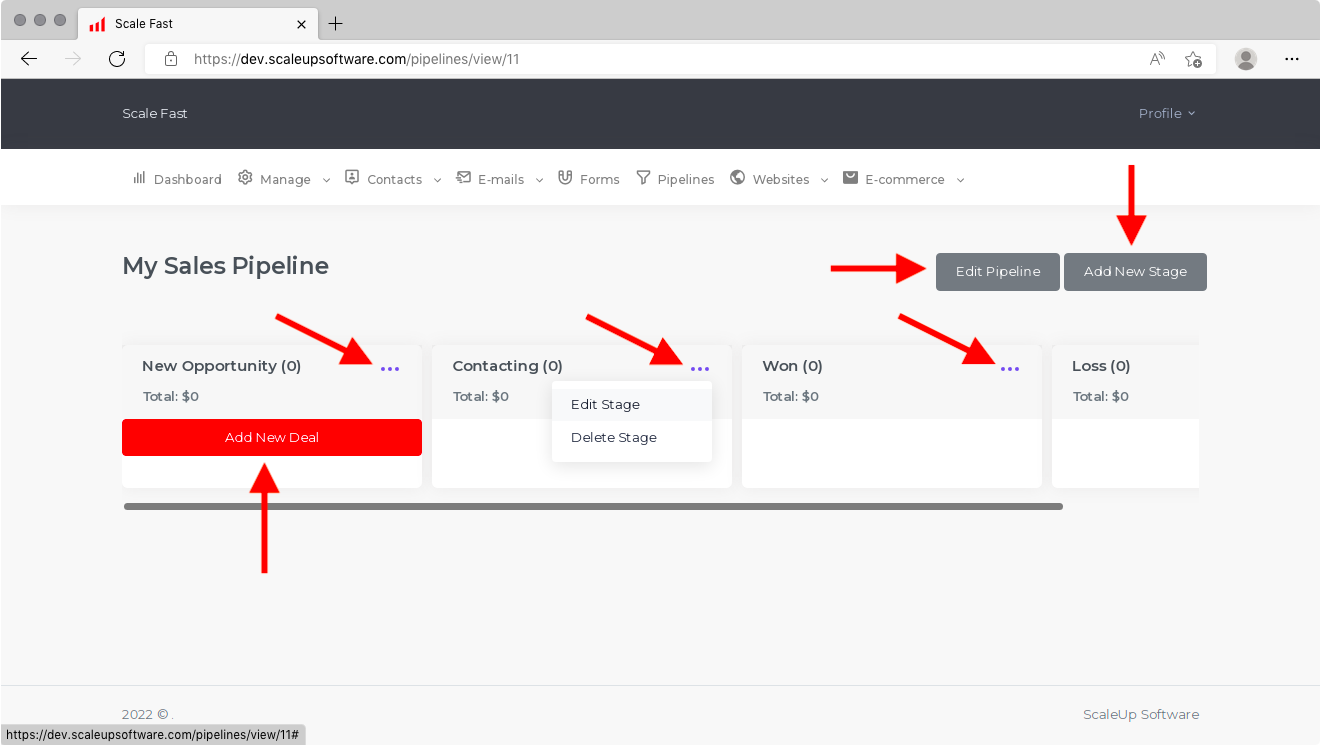
The new Pipeline will load on your screen as follows. You will see an Edit Pipeline button, an Add New Stage button, an Add New Deal button and four columns labeled New Opportunity, Contacting, Won and Loss. These columns are the four default stages of your Pipeline, which you can either leave as they are or edit or delete as you choose.
To edit the settings of the Pipeline, click on Edit Pipeline. You will see a pop-up window appear, similar to the following.
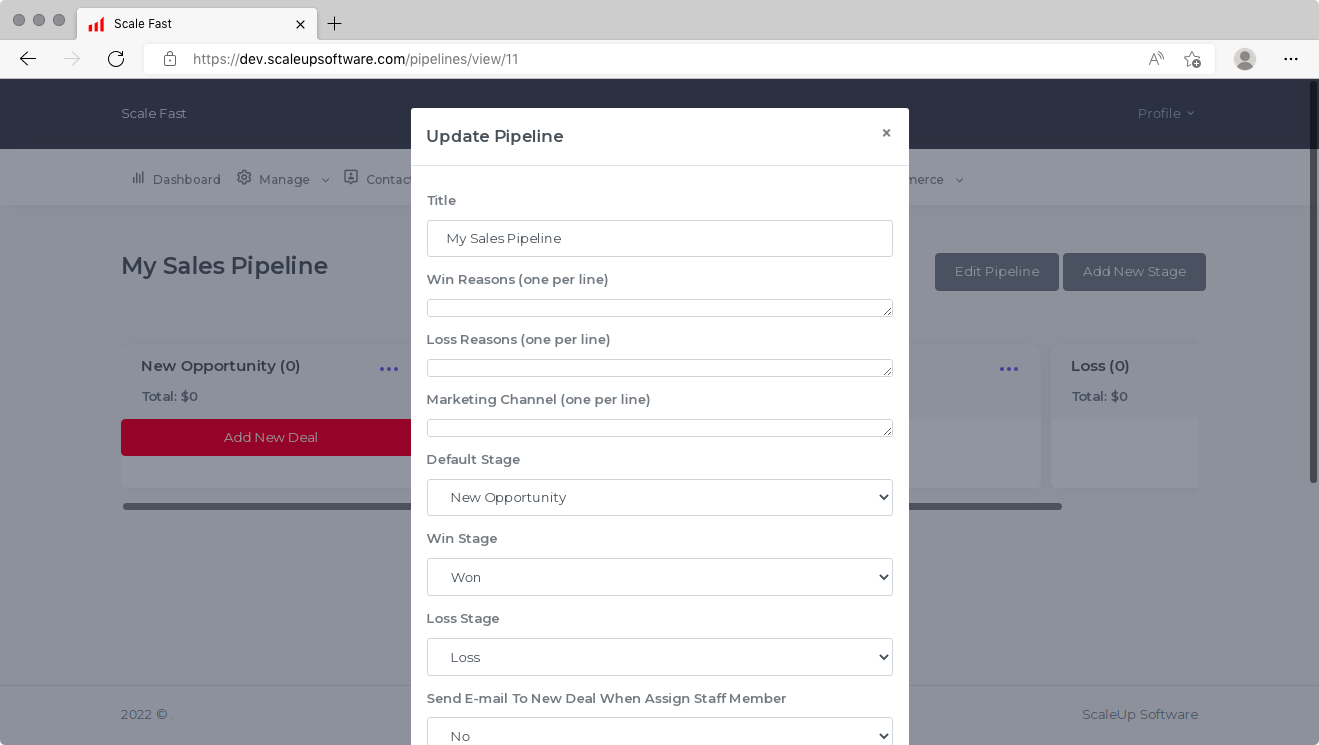
Title: Change the title of your Pipeline here.
Win Reasons: Here, you can list all the possible reasons that a deal can be "won." When you create a deal for this Pipeline, you will be able to record for your reference which reason(s) apply. Make sure you include a line break in between each reason.
Loss Reasons: Here, you can list all the possible reasons that a deal can be "lost." When you create a deal for this Pipeline, you will be able to record for your reference which reason(s) apply. Make sure you include a line break in between each reason.
Marketing Channel: Here, you can list all the possible marketing channels that a deal can be sourced from. When you create a deal for this Pipeline, you will be able to record for your reference which marketing channel(s) apply. Make sure you include a line break in between each marketing channel.
Default Stage: New deals will be added to this stage initially by default. Note that you need to create the stage (see below section) before you can select it from the list.
Win Stage: When a deal is "won," it will be moved to this stage. Note that you need to create the stage (see below section) before you can select it from the list.
Loss Stage: When a deal is "lost," it will be moved to this stage. Note that you need to create the stage (see below section) before you can select it from the list.
Send E-mail to New Deal When Assign Staff Member: Select whether to send an email to the contact when they are assigned to a staff member.
Order Stages: Drag and drop the stages to change the order they appear from left to right.
Save your changes by clicking on Update Pipeline.
Adding and Editing Stages
The default stages of the Pipeline are New Opportunity, Contacting, Won and Loss. However, you have the ability to change or delete any or all of the four default stages. In the top-right corner of each column, just click on the three dots to expose the options to Edit Stage or Delete Stage.
You can also add more stages to the pipeline by clicking on the Add New Stage button.
Whether you are editing an existing stage or adding a new one, you will see a pop-up window similar to the one below.
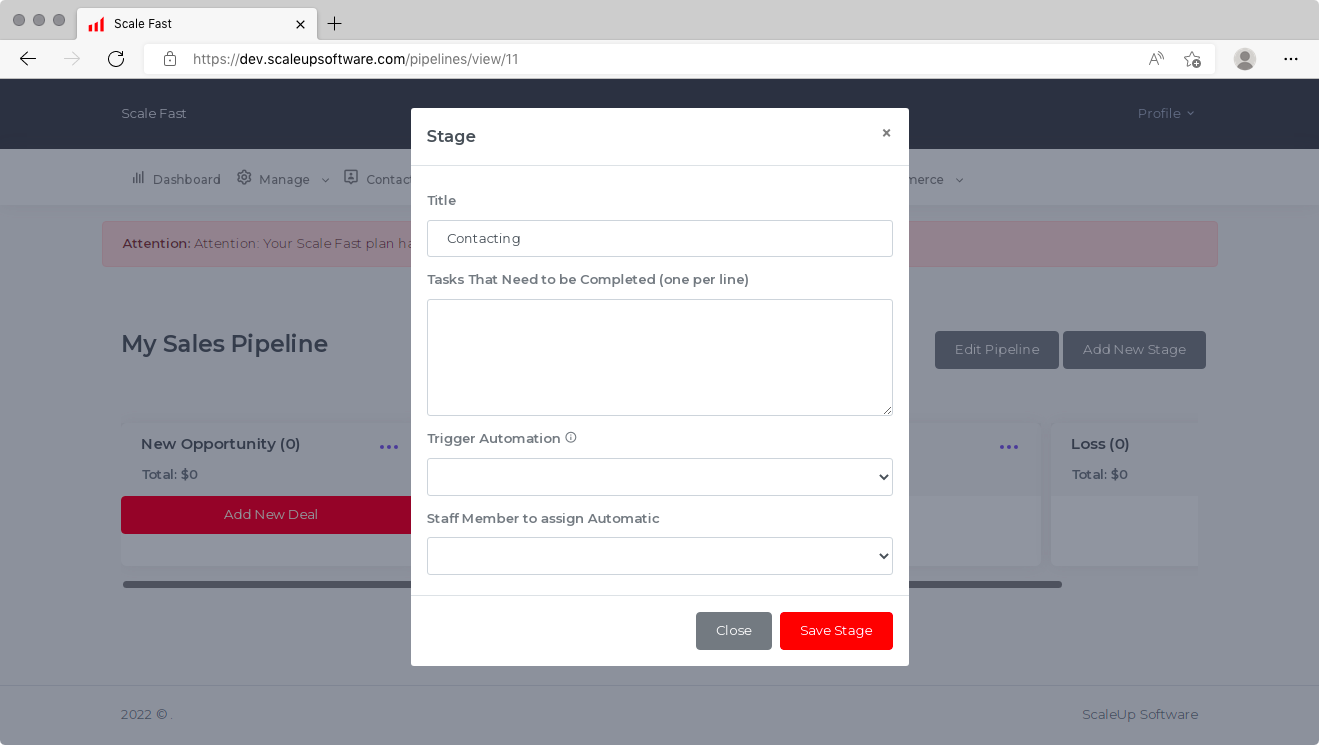
Title: The title of this stage.
Tasks That Need to be Completed: When a deal is moved to this stage, you may want the sales representative to complete a number of tasks and cross them off for each individual deal. Write the tasks here, including a line break in between each.
Trigger Automation: You can select one of your Automation sequences to be sent to a contact when they are moved to this stage.
Staff Member to assign Automatic: To assign all leads in this stage to a particular staff member by default, select the staff member here. Learn more about assigning leads to staff.
Save your changes by clicking on Save Stage.
Adding and Editing Deals
To add a deal to the pipeline, click on Add New Deal. A pop-up window will appear, similar to the one below.
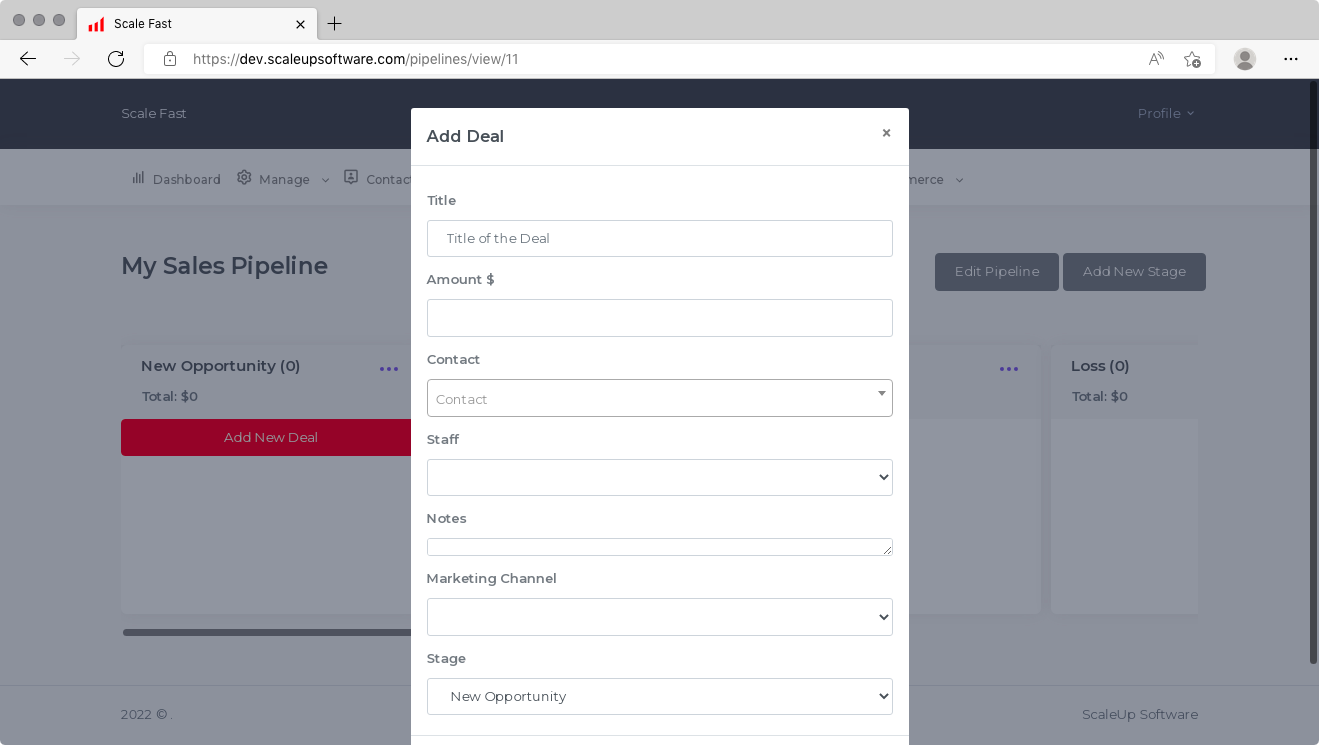
Title: Write a title for this deal.
Amount: The amount that this sale is worth to your business.
Contact: Select the contact who is being sold to. If the contact has not yet been saved to your Scale Fast account, you will need to first create them according to the Contact Lists tutorial.
Staff: To assign this deal to a staff member, select the staff member here. Learn more about assigning leads to staff.
Notes: Write any notes about the deal here.
Marketing Channel: Select the marketing channel that sourced this deal. Note that you need to add the marketing channel to this Pipeline (see above section) to select it from this list.
Stage: Select which stage to add the deal to. Note that you need to create the stage (see above section) to select it from this list.
Click on Add Deal, and you will see the deal appear as follows, under the stage that you specified. To move it to another stage, simply drag it into the other column.
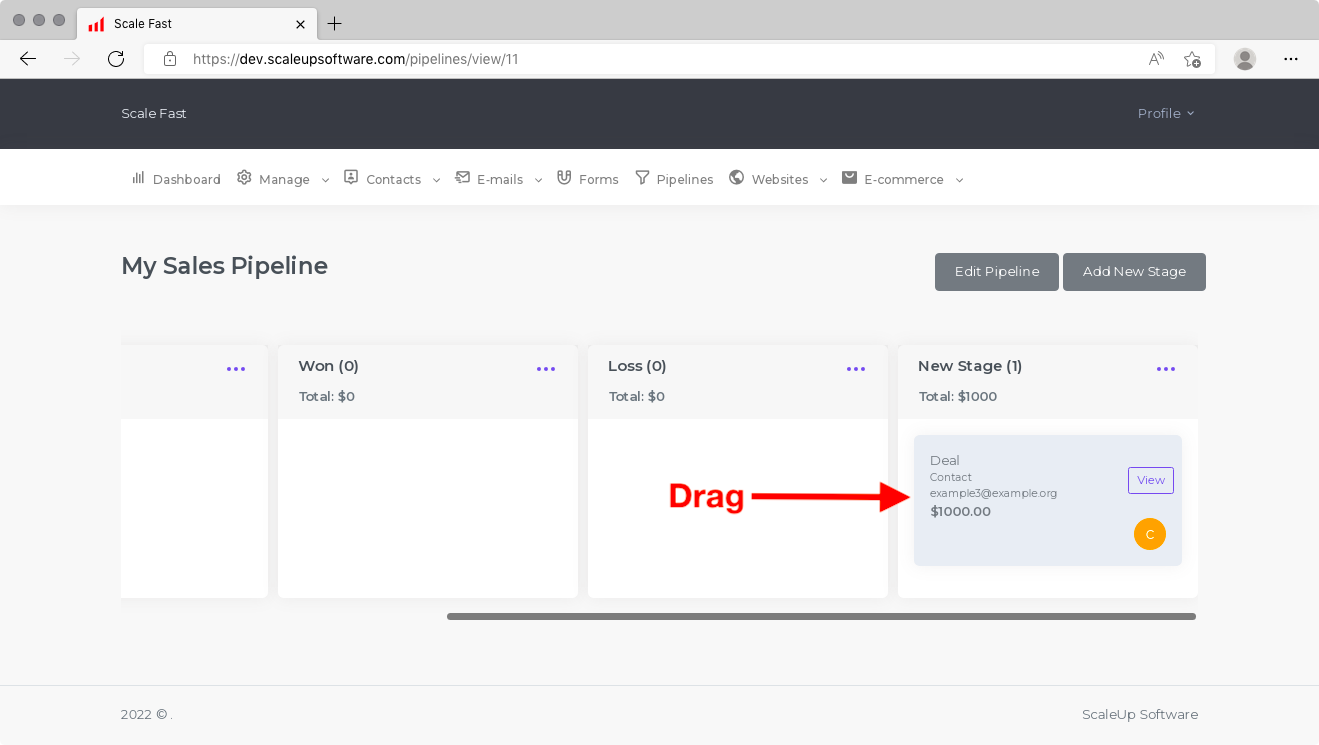
Then, when you click on View next to the deal, you will see a pop-up window appear, similar to the following.
The contact information is displayed at the top of the window, for you to contact the lead.
Tasks: Cross off the tasks as they are completed. The tasks listed are the ones that were added to the stage (see above section) that the deal is currently listed under.
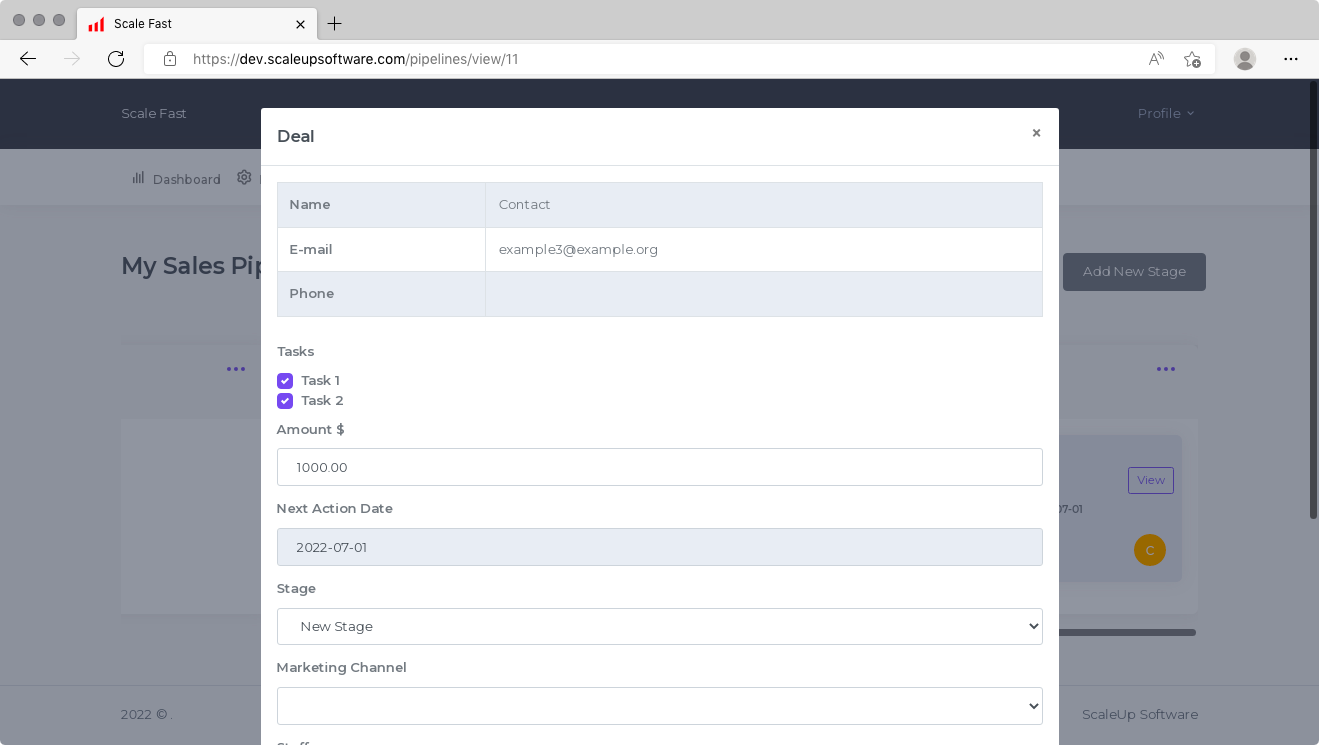
Amount: Update the amount that the deal is worth here.
Next Action Date: Set the date to next follow up with this lead.
Stage: Move the deal to a different stage here.
Marketing Channel: Update the marketing channel here.
Staff: Move the lead to a different staff member here. Learn more about assigning leads to staff.
Notes: Update the deal notes here.
Click on Save and Close when you are done.
What Next?
Did you know that it's possible for customers to add themselves to your Pipeline by completing a form on your website?
Especially if you are planning of moving a lot of leads through this Pipeline, or you are creating fresh leads who did not previously exist in your Scale Fast account, this method may be more suited to your sales process than manually clicking Add New Deal for every new deal.

